Thursday, April 30, 2009

Travel Photography course in Cairns

Things have been really busy for me lately and I have really missed running my weekend photography courses in Cairns. The chance to mix with fellow travel photography lovers is always a highlight and I'm happy to say I will be able to do it again in late June.

These two jam-packed days of photography are for those of you who want to improve the images you take on holidays. Film is gone and digital is in. How well do you know your digital camera? How has it changed your travel photography?

We'll start off talking a bit about the technical things. Apertures, shutter speeds, ISO. What focal length lens do I need for this effect? What's the difference between the telephoto and the wide-angle? What's this white balance thing? Do I need a tripod? How do I carry all this stuff? What filters do I need?

Then when we have a handle on the technical things we'll move on to the artistic side of the equation. How do I capture that great sunset? Compose the winning shot? Approach people to take their portraits? Photograph the right subject at the right time of day? Master available light? Use my flash?

I run the courses with only a small number of participants. This means that we have an intimate group and people can ask as many questions as they want. The aim is to have every one of you leave having learnt what you wanted to find out. There is a full set of course notes covering everything so you can go back at a later date to refresh your memory and I am always available for questions after the course has finished for those with ongoing questions.

Think of it like your own personal photography book - only one that talks back and answers your questions!

The course will run for two full days over the weekend of the 27th and 28th June. Then a couple of weeks later we'll all get together again at a cafe in town and show our photographs and what we learnt. Places are strictly limited to the first 20 people who book and the cost for the weekend is $190 (including GST)

For those of you who don't know me, a little bit about myself. I'm a professional travel photographer with 10 years in the industry. I am a contracted photographer for Lonely Planet Images and have been featured in more than 45 of their guidebooks ranging from Tokyo to Nepal, from Southern Africa to Australia and pretty much everywhere else in between. My images have been published in magazines, newspapers and books all around the world including magazines such as National Geographic Traveler, TIME, Vacations & Travel and Backpacker Essentials.


Some former students have kindly written their impressions of the course and given me permission to post them here:

"Paul Dymond is an excellent photography teacher. As a participant at a number of his courses I would happily recommend him to anyone wishing to learn more about how to take better pictures. He is an amazing photographer and his skill as a teacher and love of photography combined with his professional experience ensures everyone comes away with new tips, techniques, ideas and inspiration."

Peace Mitchell
Exhibition coordinator - Cassowary Coast Camera Club

We have enjoyed every one of your courses and would be very happy to repeat them all! Some of us are slow learners! The courses have been informative, very encouraging and a lot of fun, and have inspired us to get out and about with our cameras and take pictures of things we might not have previously considered. And of course, we have since upgraded our cameras and lenses!

Peter and Janet Smith


So if you're keen on coming along please let me know ASAP at info (at) dymond dot com dot au. Or if you know somebody who might be interested please pass this along.

cheers

Paul

Live View and exposure compensation

Alright this will be my last ever post on Live View - I promise! But I just had to let you know about this trick, with one caveat. I know my camera does this but I don't know if every one does. So, as they say in geek speak - YMMV - or for those of us who prefer good old English - Your Mileage May Vary.

Exposure compensation is one of those confusing little functions on cameras. A lot of people aren't really sure how to use it, or when to use it, or even if they need to use it.

Well the answer to the above questions are: yes you most likely need to use it. You need to use it when the subject of your photograph is really white (like snow, sand) or really black (like cameras). And how to use it? Well that's the tricky bit.

Why you need it in a nutshell. When camera boffins invented the light meters in cameras they had to work out how to get a good exposure so you could take a photo in almost any condition and get a good result. So they took an average mix of lighting situations and stuck 'em all together in a metaphorical bucket and came to the conclusion that the meter needed to read 18% grey. In other words a scene of 'average reflectance' would be 18% grey. And for a lot of situations they were right.

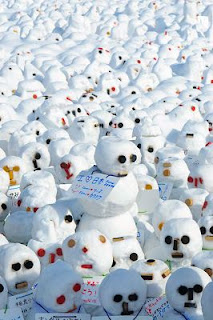
Only not everything works that way. Our little snowmen above for instance would look pretty ordinary as 18% grey, so we have to use the exposure compensation button to lighten our exposure and turn them back to white again. Exactly how much compensation we need is a bit of a dark art, shrouded in mystery. There's no hard and fast rule and it was always a bit hit and miss with film. Often you made a judgement based on experience and guesswork rather than any science.

With digital came the histogram. If you looked at the back of your camera after taking an image and noticed that the histogram was too far to the left then you moved your exposure compensation and took another photograph, checked the image and continued to do that until you got the right exposure. Pretty fool proof but can be a bit time-consuming.

Now with Live View you can check the effects of exposure compensation on the fly. You might have to enable it in the Custom Functions of your camera but once you do that things are set up so that when you point your camera at an object, switch Live View on and then fiddle with the exposure compensation button you can actually see the picture get brighter and darker with each increase or decrease in exposure.

Seeing things visually always helps you understand difficult concepts so much more easily I find and doing it this way is very intuitive. Using the histogram meant you might have to take two or three shots in a row until you get the exposure you want, whereas if you view it on the LCD you can actively judge the image while you look at it getting brighter or darker and choose when to stop. This is a great time saving feature and I think a really good way of getting a feel for exposure compensation and how it works.

And that's all I have to say about Live View forever and a day!

Wednesday, April 29, 2009

The perfect lens for shy people photographers

Are you the interminably shy type? When you're off gallivanting in foreign places you would love to take intimate portraits of the locals but just feel too overcome with embarrassment to ask them?

Well have I got the perfect lens for you! There's only one catch - you gotta get in close. :)

Many shy photographers tend to hold back and shoot people with a long telephoto lens. The reasoning is that they can remain inconspicuous and take candid shots without being noticed. There's only one problem. You will definitely be noticed. There is nothing more obvious than somebody standing a few feet away pointing a great big lens at you. And when you get discovered you'll most likely get yelled at, a nasty gesture or just a suspicious look. Not perfect travel material.

But what if there was a way to photograph people in their environment whilst at the same time making telling portraits? Well there is and it's at the opposite end of the telephoto spectrum. It's a wide-angle lens.

The reason a wide-angle works so well is that you can work in nice and close to people without them even knowing. Because the angle of view is so expansive you can be pointing the camera at a seemingly insignificant trinket and still have people in the corners of the frame.

In this case I actually was photographing the New Years good luck arrows but I wanted some life in image with people. So I put these two temple attendants off in the left hand side of the frame. They had no idea they were being photographed so look nice and natural as they serve customers.

Sure it's not as perfect as a nice, close-up, intimate portrait but if you suffer from being really shy then it's a great way to go home with some people pics. And things happen when you're this close to people. If they notice you're taking photos they might invite you to take a photo of whatever they're selling, or better still offer to pose for you. Using the wide-angle helps you get up and close to people which then gives them the opportunity to interact with you if you're feeling too shy to interact with them.

So get out those wide-angle lenses and go and meet some people.