Monday, March 23, 2009

War on Photographers

When did photography become something practised by terrorists and pedophiles and nobody else? When did it become such a filthy occupation that we are vilified wherever we go?

Am I exaggerating things? Maybe, maybe not. This Monday's link is more of a rant than a link but it was prompted by this article here.

Printed a little while back in my local newspaper The Cairns Post it tells the story of a local attraction - the Esplanade Lagoon. This is a photo of the Lagoon taken before sunrise.

If you have a read of the article it mentions that one of the reasons that they charge hundreds of dollars for a photography permit is so they can register professionals and make sure they're not pedophiles. I mean call me stupid but if you were a pedophile would you go to the Lagoon at 5.30 in the morning and photograph with a giant zoom lens on a tripod?

Has anybody ever heard of somebody dodgy being arrested carrying thousands of dollars of photographic gear? From what I can see it seems to be mostly camera phones and the like stuck to people's shoes. It is just getting ridiculous.

I've just heard that in the UK they've passed a law that makes it illegal to photograph, amongst other things, policemen! No more travel photos of your friendly neighbourhood bobby. Where does it all end?

It's funny how all these places around the world are cracking down on so-called professional photographers but how do the security guards who have to enforce these rules decide who is a professional? Apparently in many cases it's how expensive your gear looks and whether you have a tripod or not. If you have a tripod you must be a professional. What a joke.

When these rules here in Cairns first came in I rang the local council because there was a clause in the permit contract that said that if the photos were used to promote the local area you didn't need a permit. When I explained to the lady on the phone what I did for a living she told me I didn't need a permit. When I asked if the security guards down there would know this she said, and I quote, "Nah, just tell 'em you're an amateur!" When I asked her if it was official council policy for people to lie in order to take photos she told me that she hadn't said anything.

And that's why I have never been back to photograph the Esplanade. This photo was taken before the permit system came in. In my view they should be paying me to promote their lovely Lagoon not the other way around. The stories about foreign tourists getting thrown out by overzealous security guards makes you cringe for those tourism bodies trying to attract people to our shores.

What's it like in your part of the world? Is photography free and open or are you being hounded? Let me know in the comments as it's always nice to get a world perspective on this.

Rant over! seeya tomorrow for a happier post. :)

Friday, March 20, 2009

End of the night

So it's coming up to 7 hours out in the freezing cold taking photos. I've walked a lot of miles through the city of Sapporo and come away with some nice shots. A good overall coverage.

One last photo I need before I go is the entrance sign to the Susukino ice statues area. In and of itself it's nothing to write home about. A neon sign in the middle of the road. But as a part of the coverage of an area it's quite vital because it tells the readers where you are.

For some reason my stock agency always takes every image I have ever taken of a sign! I don't know why this is because they never seem to sell too well but they always take them. Maybe they're planning a book on signs some time. I don't know but I always shoot them because they set the location in an easy-to-read way.

And the final shot before I put the camera back in the backpack? One that shows the entertainment area of Susukino.

I've shot this corner a million times and never get sick of all that neon. I usually shoot it looking downtown (towards where the ice festival was) but this time shot back towards uptown.

The main reason I did this was to show all the taxis lined up along the street, and the way in which they were all shining red under the garish neon signs.

At about this time I was looking frantically at my watch and preparing to run. Trying to make the last train home? Not quite. Trying to make the closing of Kinokuniya bookstore - a giant book paradise with a photography section that is absolutely huge! A night out without the kids in tow and I would have an hour or so to look at photo books at my leisure. Paradise!

So I ran about 20 blocks only to find they closed at 9 and not 10 like I thought. Oh well, maybe next year!

I hope you enjoyed my run through a night of photography in Japan and next week we'll head back to our regular transmission of images from around the world and the stories behind them.

Have a great weekend.

Thursday, March 19, 2009

Answer to a rhetorical question

So a couple of days ago I posed the problem of how do you make a totally transparent, not very clearly defined object look interesting. Even the autofocus has trouble with a lot of the statues.

Well the real answer is that you let the sculptors do it for you! Just like the Odori area where they couldn't be satisfied with giant statues of Mickey Mouse but they had to light them up in all the colours of the rainbow or put rock stars in front of them.

In this case the artists thought more internally. As in inside the ice. Some bright spark came up with the idea of putting recently killed seafood from the local fish market in there to make things interesting. Take a good look at that photo above. That there is real fish (and there were giant crabs as well) encased in ice. How bizarre. But extremely photogenic!


Just in case you didn't believe me about the crabs!

In actual fact this particular set of carvings (and there's only a couple of them) is one of the most famous things about the whole Susukino section of the Snow Festival.

It's one of those situations where, as a travel photographer there to record what you see and do, you have to put aside any judgements and simply record what you see and let the audience decide.

Our job is to tell a story, show how other cultures live and try and record it as honestly and without bias as we can. The sight of blood coming out of the mouths of the fish didn't thrill me too much but I chose to concentrate more on the pleasing aspects of the display. The enjoyment it brought to the people.


These folks seemed to be as intrigued with it as I was. I've used a bit of flash here to fill in shadow details on the man's face. On the other side of the street a light kept faces nice and bright but on this side the lights didn't seem to be illuminating faces so I needed to use a bit of flash.

Because I only wanted to light the people and not the fish I tilted the head of my flash towards the people, and even though I was using a wide-angle lens I zoomed the flash head to 85mm so it would be concentrated on the faces. Again there's minus 2 compensation and an orange gel in there so it's pretty subtle.

Wednesday, March 18, 2009

A bit of action

So far most of my images have been of the statues and carvings themselves, and the people there to watch them. But I realised that I also needed a couple of shots of the people making the statues.

Good thing for me the festival organisers agreed with me and kindly supplied me with a very cold looking model to carve away. (Actually I just happened to stumble across this guy working away but don't tell anyone!)

I had seen a few photos taken of the ice carvers in Susukino before but mostly they involved really harsh, direct flash with gaping black backgrounds. Call me fussy but I just hate black backgrounds. No sense of place.

The reason why you get a black background with flash is your shutter speed. If you have your camera in one of its automatic modes the shutter speed defaults to roughly 1/60th second. This is a good speed for handholding but a shocking speed if you want to see what's in the background. The shutter isn't open long enough for the natural light in the background to burn itself on to the retina that is your digital sensor (or film).

So you need to put your camera in a mode that will let you have a slow shutter speed while using the flash. It will differ from brand to brand, and many cameras even have a Night Portrait setting now. That's the one you want to use. You will suddenly find that instead of 1/60th second or something like that you might end up with 1/15th second or slower depending on how bright it is and your ISO.

In this particular case I was set at ISO 400 and didn't want to go too much higher if I could help it. If I had had a really dark background I would have needed a very slow shutter speed to get my background looking nice so I walked around until I found a nice bright background. Doing that gave me a shutter speed of 1/25th second.

The flash has rendered the subject nice and sharp while remaining fairly subtle. A couple of reasons for that. One I had minus 2 exposure compensation dialed in just to light it a little bit. Two I had my famous orange gel over the flash so that the light was a similar colour to the surrounding ambient light - thus blending the two. If you don't do this what you get is a white carving and carver with a bright orange looking background. The orange gel lets you have your foreground carver (lit by the flash) the same colour as the background (natural ambient light).

If I had left the white balance as I had it set in camera (Daylight) and was shooting Jpeg everything would have turned out funky orange but because I shoot RAW I just cooled the temperature down in the computer so that everything - both foreground and background - looked white and clean.

At 1/25th second with a 28-70mm zoom I was right on the edge of what I can hand hold. I was leaning on a fence and standing very still, looking through the viewfinder and waiting until I sensed that the man's head and body weren't moving so much but his hands were in a flurry of flying ice. The flash is a bit of an insurance policy against motion blur as it tends to freeze movement very nicely because of its short duration. Another insurance policy is to shoot multiple frames in a row with your motor drive set to High. By shooting multiple frames you can usually guarantee that at least one of them will be reasonably sharp! Hopefully. :)

Tuesday, March 17, 2009

Ice, ice baby

Alright so I guess obtuse references to one-hit wonder 80's rappers gives my age away but I just couldn't resist. :)

Down in the entertainment quarter of Sapporo they hold an ice carving festival. All along the main street of Susukino hundreds of statues sit in the middle of the road, with many more people slipping and sliding on the snow to get a look at them.

So how do you photograph a totally clear piece of carving that your autofocus doesn't even manage to lock on to? Well you don't basically. Because for the most part they're not that exciting (although there are a couple of exceptions which I'll show you in a couple of days).

So for the most part I used a wide-angle lens to include the neon signs all around and the hundreds of tourists. Usually when I do street photography I have a small waist bag (Lowepro Orion Trekker) which carries a body with a 28-70mm, a 10-22mm and a 70-200mm. On this night I had my backpack with me because I was photographing so many different things all in one hit.

The backpack is great for carrying stuff over long distances but it really is a pain in the arse (butt for you North American folks!) trying to change lenses. So in this case I walked downtown with a wide-angle lens on, then when I got to the end of the festival I changed lenses for a short telephoto and walked back again - thus saving having to constantly change lenses. And it worked pretty well.

The one thing I love about photographing down in Susukino is that it's so brightly lit with neon you almost have the equivalent shutter speeds of shooting during the middle of a sunny day! Well maybe not quite but it is still pretty bright. I shot everything handheld at ISO 400 and was getting shutter speeds in the 1/125 second range.

The other advantage of being so well lit is that for the most part I didn't need to use any fill flash to lighten people's faces. Being unencumbered by tripods and flashes makes street photography a whole lot more fun - even with a giant backpack making you look like a giant Lowepro turtle!

Monday, March 16, 2009

If you don't like your greens...

change 'em! In the last few years camera manufactures have been bringing out their cameras with in-built profiles.

With names like Portrait, Standard, Landscape, Vivid etc they are designed to emulate the look we got from different films.

If you shoot jpeg it does it all in-camera for you, and if you shot RAW you can make the settings in the camera company's raw processing software.

And therein lies the problem. For the most part nobody really likes the camera company software. Indeed many people who shoot RAW end up processing their files in Adobe software - whether Camera RAW or Lightroom. The problem up until now has been that those lovely profiles haven't been available in Adobe software.

Until now (well they actually first posted them last October I'm just a bit slow in telling you!). You can download them here and then run the little programme and it will install itself in your computer so that the next time you run Adobe Camera RAW you will get the option to use these profiles.

This in itself is enough to make you want to jump up and down with joy. Previously bland raw files, with the click of a button suddenly become vibrant images reminiscent of your favourite Velvia slides.

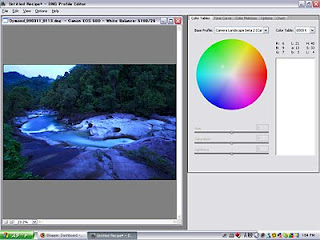
But even more useful perhaps is the DNG profile editor programme (seen above). This handy little programme lets you open up a DNG file, click anywhere in your picture where you don't like the colour (greens are one of my pet complaints with digital) and change just those colours without affecting anything else.

You click on a green tree and a little circle appears on the colour wheel. You can then drag that little green circle to anywhere you want on the colour wheel and all occurences of that same colour will turn the colour you wish. So in my case I've always felt the Canon greens were a little too yellowy for my taste so I clicked on a green rainforest leaf and dragged the little circle to a greener part of the colour wheel. Bam - all the green leaves in the picture lost their yellowy tinge.

You then save that particular 'recipe', export it to Camera RAW and every time you go to process a green tree picture in Camera RAW you can automatically apply that recipe to it to get your greens looking good.

One of my best friends in the whole world is a fantastic photographer named Kerry Trapnell. I'd send you to his website but the slack bum hasn't got one up and running yet! Just do a search for him on Google and you're sure to find lots of his work.

Anyway Kerry has been very reticent about using digital for a lot of his digital work because of the horrible results he's been getting with his greens. I installed the camera profiles and then the profile editor on his computer and let's just say he's not so reticent about shooting landscapes with the digital any more! Now his greens positively pop off the page.

So pop off to the Adobe site here , assuming you're an Adobe user, and download the two free pieces of software - the camera profiles and the camera profile editor. You'll never feel the same way about digital colour again.

Next time we'll head back to the Sapporo Snow Festival to continue my night of photography. We'll head to the entertainment quarter of Susukino and it's amazing ice sculptures with real fish inside!

Friday, March 13, 2009

Show the interaction

Ok firstly a warning. Today's post is just an excuse to post a whole heap of pictures!

One thing I really wanted to show with my coverage of the snow festival is the way in which visitors interact with the sculptures. Not just the way they interact, but how they were affected by it.

I used various focal length lenses to get different effects so just wanted to talk about a few pictures and the thought process behind them.

For this first image the first thing I noticed was the way the shadows were falling across the snow, almost pointing towards the statues, just as the woman in the photo is. So I turned my flash off so as not to wash the shadows out.

I used a wide-angle lens to fit as many people in because I wanted to show not only how many people visit, but how hard it is to get a picture without any other people in the frame!

And in terms of the white balance, even though the statues are lit by spotlights and look a kind of orangey colour to the camera, I brought them back to white just to give the feeling of snow. Also I think that the cooler colour temperature makes the overall scene look colder than it would if it was more orange.

The image above was taken in a part of Odori Park which was really well lit but other parts of the park were in near complete darkness, towered over by these giant lit-up statues.

So for this image I wanted to convey that darkness so I used my flash to light up just the little part in front of my camera and let the rest fade to black. I've used the orange gel over my flash to keep in balance with the lighting on the statues.

I had been photographing these little girls photographing the giant castle when I noticed this old lady trudging along, totally oblivious to the excitement and joy around her. Immediately I saw an opportunity to portray a different and contrasting set of reactions to the festival. One - the young girl, maybe her first time here, thrilled at the spectacle. Two - an old lady rugged up against the cold, not even paying attention to the statues but just hurrying on her way home to the warmth.

Walking farther down the park I came across a crowd of people watching an aerial ski display (is there anything they don't have at the snow festival?)

In this instance I decided to use a telephoto lens to concentrate on the faces of the people. The only problem with the telephoto is it brings the background in nice and close. No point having an office block as a background, or even just plain black sky. If it's photos of the snow festival you want you need a snow castle background. So I moved around until I found a position where there were people in the foreground and a castle in the background.

The I looked through the viewfinder and just waited until both the man and his girlfriend were both looking in the same direction and looked interested. I left the white balance quite warm here to give a feeling of warmth between the couple. If I had turned the background castle snowy white the photo would have had quite a cold feeling not quite in tune with the feelings of the couple. Remember that the colour of an image has a great impact on the emotion it conveys.

Of course Japan being Japan they couldn't just build ginormous statues of snow and be satisfied. As we've seen they have to put rock bands and aerial skiiers in front of them. Or better yet put a kaleidoscopic light show on them!

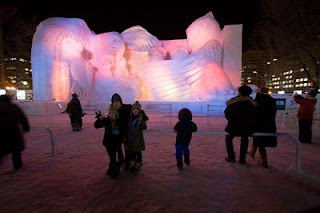
That's what happened here. Again I reached for the wide-angle lens to show how the statues are in the heart of the city, as well as show how many people come to see it. I used a tiny amount of fill flash to prevent the foreground father and children from being completely silhouetted but everybody else in the frame pretty much is.

For my white balance I left it on daylight to show the deep pink colours that were illuminating the snow.

And my final shot was one I had to wait for for quite a while. I had a vision in my head of photographing the statues with a telephoto lens (to emphasise the hugeness) and having a person standing at the front of the statue.

In practicality it was quite difficult for a couple of reasons. Firstly to use the telephoto lens you need to be quite a long way away. The statues are reasonably close together so for many of them I just couldn't get far enough away to use a telephoto lens, and when I could there was too much stuff (usually people) in the way.

That's why I was wrapped with this statue which had a big, wide area in front of it where I could get quite far away and still have a clear view to the statue.

So I set my camera up on the tripod and waited. And waited and waited. I don't know what it was but hundreds of people just refused to go near the statue! They were all standing back to photograph the whole thing but nobody actually walked up for a closer look. I was about to give up after about 10 minutes when I noticed a little girl walking towards the statues, and more importantly towards the camera. Crossing my fingers, holding my breath and sure enough she walked right where I wanted her to. And she had a great pink down coat and a flu mask as well.

Sometimes the gods do smile on us poor ol' travel photographers. And that was the final image I took at the Odori Park area. Next week it's down to Susukino for the ice sculptures - including ones containing real fish and crabs!